So you’re ready to design a bar. Maybe it’s your first, maybe you’re reimagining a tired setup that’s seen better days, or maybe you’ve just realized your current layout is about as efficient as a bicycle with square wheels. Whatever brought you here, you’re in the right place.
In this guide, we’ll walk through every crucial element of bar design, from nailing down your concept to selecting materials that’ll survive the inevitable weekend rush, from lighting that sets the mood to storage solutions your bartenders will actually thank you for. Think of this as your blueprint for creating a bar that’s not just beautiful, but brilliantly functional too.
How to design a bar: concept, layout, and style
Your bar concept is your North Star—everything else flows from this decision. Are you building a speakeasy-style cocktail lounge where mixology is theater? A high-energy sports bar where the TVs outnumber the staff? A neighborhood dive that’s all about unpretentious comfort? This determines your layout, materials, equipment needs, and budget.
Start by asking who you’re serving. A craft cocktail bar needs ample standing room and sleek surfaces that photograph well. A wine bar targeting date-night couples requires intimate seating and softer lighting. Sports bar regulars expect clear sightlines to every screen and enough elbow room to gesture wildly.
Your concept also dictates your design language. Industrial chic with exposed brick? Polished and minimalist? Warm and rustic with reclaimed wood? Pin down this vision early with a mood board, because changing your mind halfway through construction is expensive and soul-crushing.
And here’s the thing: authenticity matters. Don’t build a tiki bar if you secretly hate tiki bars. Design something you’d actually want to hang out in, because you’ll be spending a lot of time there.
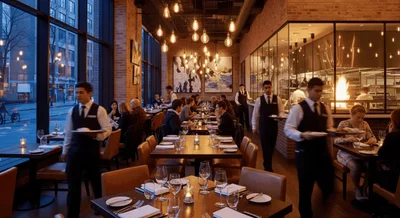
Bar layout planning: dimensions, flow, and seating tips
Your floor plan is the skeleton of your entire operation. Getting it wrong means watching your bartenders awkwardly navigate around each other for years to come.
Bar dimensions and workspace
A standard bar top sits 42-45 inches (107-114 cm) high. The bar should be at least 16-20 inches (41-51 cm) deep on the customer side, giving space for drinks and personal belongings.
Behind the bar, bartenders need a minimum of 3 feet (91 cm) of working width between the back bar and front bar. Four feet (122 cm) is better for busy operations with multiple bartenders. Any narrower creates traffic jams; any wider means excessive walking during peak hours.
For bar length, allocate roughly 2 feet (61 cm) per seated customer. A 20-foot (6-meter) bar comfortably seats about 10 people. Account for service wells and dead space near walls and corners.
Traffic flow optimization
Clear pathways are essential. Customers should reach the bar, restrooms, and exit without obstacle courses.
Main aisles need at least 4-5 feet (122-152 cm) of width, especially near the bar where people congregate. Secondary pathways require 3 feet (91 cm) minimum. Nothing kills ambiance faster than customers constantly bumping into each other.
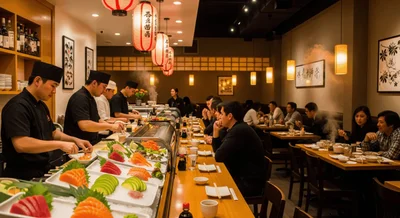
For seating, mix bar stools for solo drinkers and couples, high-top tables for small groups, and booths or banquettes if space allows. Each seating type serves different customers and occasions.
Best bar materials: top surfaces, finishes, and durability
Materials matter more than you think. Cut corners now, replace everything in two years.
Bar top material options
Your bar top takes serious abuse from spills, heat, scratches, and leaning patrons. Wood (maple, oak, walnut) is classic and warm but requires regular maintenance and sealing. Stainless steel is indestructible and professional but shows every fingerprint.
Granite and quartz offer durability with style—heat-resistant, stain-resistant, and available in countless colors. The downside? Heavy and pricey. Concrete is customizable and industrial-looking but needs proper sealing to avoid permanent stains.
For other finishes, consider how everything works together. Your bar front can be clad in reclaimed wood, tile, metal panels, or backlit onyx. Flooring behind the bar needs to be slip-resistant and easy to clean—rubber bar mats over sealed concrete or commercial tile work well. Skip anything porous or hard to sanitize.
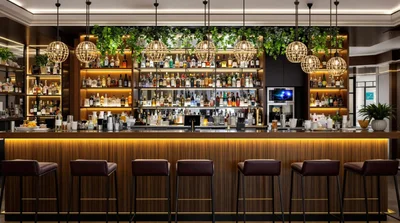
Back bar storage: efficient organization for bartenders
The back bar is your bartender’s command center, and proper design can shave seconds off every drink order. Multiply that by hundreds of orders per night, and you’re looking at real money.
Start with your speed rail—the metal rack holding your most-used liquors within arm’s reach. Position it along the front edge of your work surface. Your well spirits and frequently grabbed modifiers live here.
Shelving should be tiered so bartenders can see everything at a glance. Lower shelves hold backup bottles and less-used spirits; upper shelves (usually backlit) display premium bottles. Ensure shelves are at least 4-5 inches (10-13 cm) deep for standard bottles.
For glassware, overhead racks work well for stemware, freeing up counter space while keeping glasses accessible. Regular glasses can go on lower shelves or in under-bar refrigeration. Group them by type—mixing highball glasses with rocks glasses slows service.
Don’t forget ice wells, sinks (at least two, preferably three), and refrigeration. Everything your bartender needs should be within a pivot and a reach.
Bar lighting design: ambiance and functionality combined
Lighting is mood magic. Get it right and your bar glows with atmosphere; get it wrong and it feels like a DMV waiting room or a cave where people squint at their menus.
You need layered lighting: ambient, task, and accent. Ambient lighting sets the overall mood. Install dimmer switches—what works at 5 PM happy hour won’t work at 11 PM. Use warm color temperatures (2700-3000K) rather than harsh cool whites. Humans and cocktails both look better under warm light.
Task lighting is practical. Bartenders need bright, focused light over their work area—under-cabinet LEDs or direct downlights work perfectly for reading tickets, identifying bottles, and garnishing drinks.
Accent lighting is where you get creative. Backlit shelves make bottles glow like liquid jewels. LED strips under the bar edge create a floating effect. Pendant lights provide focal points and intimacy. Statement fixtures—vintage Edison bulbs, geometric shapes, custom pieces—become conversation starters.
One pro tip: avoid lights that shine directly in customers’ eyes when seated. Nobody enjoys feeling interrogated.
Bar equipment and plumbing: essential requirements
Equipment and plumbing make everything actually work. Skimp here and you’ll regret it mid-Saturday rush.
Plumbing requirements are significant. You need water supply lines and drains for sinks (at least a three-compartment sink), ice machines, glass washers, and beer systems. Work with a licensed plumber early—retrofitting after construction starts is expensive. Ensure your drainage can handle high volume.
Ice machines deserve special attention. Calculate needs based on expected volume (roughly one pound per drink during peak service). Commercial units need proper ventilation, water supply, and drainage. Air-cooled units are cheaper but generate heat; water-cooled units are efficient but use more water.
Refrigeration is essential. Under-bar coolers keep beer, wine, and mixers at proper temperature within reach. Back bar refrigerators store backups and perishables. Draft beer requires a walk-in cooler or glycol system with proper lines.
Don’t forget: blenders for frozen drinks, glass washers to save time and water, POS systems positioned within bartenders’ reach, and adequate electrical outlets. Your electrical panel may need upgrading to handle the load.
Bar atmosphere: color schemes, decor, and seating choices
Now for the fun part: making your bar feel like an experience, not just a room with alcohol.
Color psychology matters. Dark, moody tones (deep blues, charcoal, burgundy) create intimate cocktail lounge vibes. Warm earth tones (terracotta, amber, deep greens) feel welcoming for neighborhood bars. Bright, bold colors inject energy for lively venues. Whatever palette you choose, keep it cohesive—a chaotic mix confuses the eye and dilutes your concept.
Decor tells your story. Leaning into local history? Display vintage photographs or neighborhood artifacts. Going modern minimalist? Choose a few statement pieces rather than cluttering surfaces. Themed bars need elements that reinforce the concept without going full theme-park (subtlety wins).
Seating creates different experiences within your space. Bar stools are classic, but prioritize comfort—if guests can’t sit comfortably for twenty minutes, they won’t stay for a second drink. Consider stools with backs and footrests. Mix in high-tops, lounge areas, and booths if your layout allows.
Texture adds depth. Combine smooth with rough, hard with soft—leather against reclaimed wood, metal accents softened by fabric curtains. These contrasts make spaces feel richer and more intentional.
Your bar design: creativity meets business strategy
Designing a bar is equal parts creativity and calculation—you’re building a business machine wrapped in atmosphere and style. Every decision, from your initial concept to the finish on your bar top, ripples through your operation, affecting efficiency, customer experience, and eventually your bottom line.
Start with a clear concept, plan your layout obsessively, choose materials that’ll survive the chaos, and layer in lighting and atmosphere that makes people want to linger. Sweat the details now—proper plumbing, adequate storage, thoughtful traffic flow—because fixing mistakes later is exponentially more expensive and disruptive.
And remember: your bar is never truly finished. Successful operators constantly tweak and refine based on how the space actually functions, not how they imagined it would. Stay flexible, listen to your staff (they’re the ones working the space daily), and be willing to adjust. Now go design something spectacular.
Frequently Asked Questions
What are the common mistakes in bar design?
- **Workflow Issues**: Ignoring bartender workflow can disrupt service. - **Inadequate Storage**: Insufficient storage leads to clutter and inefficiency. - **Poor Lighting**: Lighting should balance functionality and ambiance. - **Neglecting Customer Comfort**: Design with customer comfort in mind, ensuring the bar height, seating, and accessibility cater to diverse needs. - **Plumbing & Electrical Errors**: Misplaced plumbing and electrical systems can hinder operations.
Is it cheaper to build or buy a bar?
It is almost always cheaper to buy an existing bar than to build a new one out. This is assuming that by build out, you mean taking a white box space or existing space that is not currently used for any kind of food/bev business and turning it into a bar.